 |
|
|
|
Site Navigation
Projects & Information
»General Information»Wind turbine Projects »The F&P Smartdrive »Electronic projects »Microcontroller projects »Miscellaneous Kits & Parts
»Basicly Natural Pty Ltd»PVC & Aluminium blades »Scale model farm windmills »Price Watch Discussion Forums
Handy Links
»Wind»Solar »Electric Vehicles »Electronics »Micro Controllers »General Interrest About TheBackShed Getting Started Privacy Policy |
Using the PicAxe chips Anyone who has visited this site will know how much I love these little PicAxe chips, but what is a picaxe, and how do you get started. First up, how did I get started on PicAxe's. I had read about them a few times in SiliconChip magazine, but never took the plunge and bought one as they weren't available locally. But about 3 years ago I was wandering around the local Dick Smith electronics store and saw a Basic Stamp starters kit. It was on sale for $50, and included a BasicStamp 2, prototype board and manual. So I bought it, took it home and started learning about these little computers on a chip.
I connected a couple of LED's and little Piezo speaker to the outputs, and within 30 minutes I had the thing flashing lights and beeping. Good fun. The Basic Stamp only had digital inputs, so could not measure voltages directly ( Though I did work out a RC network to measure analogue inputs ). And they were expensive. I read about the PicAxe chips in Silicon Chip, and discovered they had true analogue inputs plus a more powerful range of commands, so I ordered in a 18A PicAxe chip from Oatley Electronics, and since then have also added a 28X and several 08M chips to my collection. They are cheap! The 08M is only about $4, and a 28X cost about $25. So how do we use a PicAxe chip? Easy. The PicAxe chip is a microprocessor with built in flash ram, digital and analogue inputs, internal watchdog timers, and digital outputs. The little chips are pre-programmed with a boot loader program, which lets it talk to your computer via a serial cable. On your computer you use a program called the PicAxe Programming Editor ( which is free to download from their web site at http://www.picaxe.co.uk/ ).
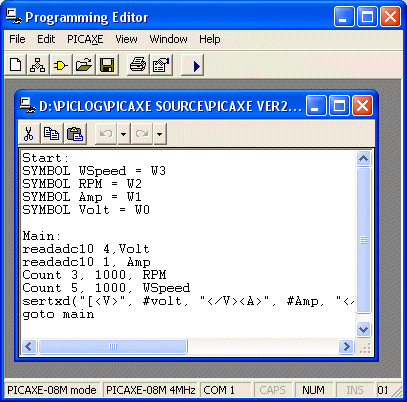
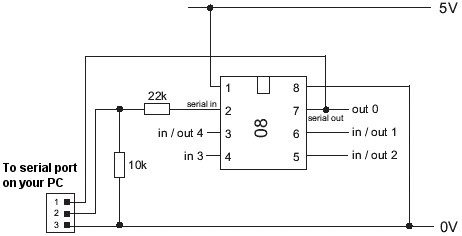
The Programming Editor lets you write a program for the PicAxe, then with a mouse click you upload this program into the PicAxe chip. The PicAxe has a flash memory, so it will remember the program even when the power is turned off. The "Language" used is a simple version of the common "Basic" programming language, anyone with experience in Basic will pick up this dialect easily. The Basic Circuit. To connect up the PicAxe we only need a simple circuit.
|
||||
This is a PicAxe 08 chip. This circuit is all we need to get a PicAxe working, though with nothing connected to the other pins it wont be very useful. On this chip we have 4 spare pins, and we can access these pins in the PicAxe program. Say we connected a LED and 330 ohm dropping resistor to Pin 6 ( In/Out 1 ), then then wrote a program on out PC like this
Once we upload the program
with the run button We can also look at pins to get info into the chip. A switch could be connected input 3 (Pin 4), and the PicAxe software could be written to check the status of this switch. The PicAxe can also read in analogue inputs, like measure a variable resistor or voltage, then act on this. ie if a voltage on input 1 goes above a set value, switch off pin 2. There are dozens of commands we can use, letting us read in analogue values, send serial data back to a connected PC ( like the PicLog ), drive mosfets and LCD displays (Charger), measure time delays and frequency, PMW output, etc, etc. If you download the PicAxe editor program, you get a bunch of PDF manuals that describe in detail all the commands, plus show you how to connect different devices like motors and relays to the PicAxe. In summary, the PicAxe lets you replace a handful of components with one little chip, which is easy to program. And the big advantage of a PicAxe is it can be reprogrammed thousands of times, so you can reuse you circuit for different applications. For more info, visit the PicAxe web site http://www.picaxe.co.uk/, buy yourself a little 08M chip for a few dollars and get into it. Once you've started with PicAxe chips you wont look back. In Australia the PicAxe chips are available from... Also worth checking out the Australian OzElecForum.com |
|||||


