|

|
Forum Index : Microcontroller and PC projects : PicoMiteHDMIUSB motherboard reference design
| Author | Message | ||||
| Mixtel90 Guru Joined: 05/10/2019 Location: United KingdomPosts: 6778 |
Yes, it can be done as a through-hole, with compatibility (more or less. I took liberties with the HDMI.) I've not completed this yet, hence the silly component numbers & stuff. It looks promising at this stage though. I've attempted to keep to Peter's layout, but decided to swap the audio jack and reset button as I probably press the reset button more than I mess with the audio jack! The Adafruit DVI breakout module isn't particularly easy to find, but it would be easy enough to do a version with a SMD HDMI socket and resistors. As I'm a cheapskate there are less LEDs. The audio output has DC blocking though as it's powerful enough to drive sensitive headphones. The Pico2 has one of those "mini plugs" with just D+ and D- on it You need 2 USB ;eads for programming. One provides the power and the other (plugged into the Pico) the data. It won't work with just one because the switcher supply is disabled. The Heartbeat LED output on TP5 can be connected to either the GPIO port or the red section of the front panel LED, which then replaces the on-board one. With the green section on the 3V3 supply if flashes green/sort-of-yellowish. A 3mm red/blue one might be nice if you can find one. Mick Zilog Inside! nascom.info for Nascom & Gemini Preliminary MMBasic docs & my PCB designs |
||||
| Volhout Guru Joined: 05/03/2018 Location: NetherlandsPosts: 4222 |
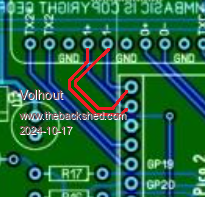
Hi Mick, I was triggered by a note on your CH340 module. Has 0.5A fuse I assume this baby is powered from the CH340 socket. Could you (on your beta unit) check what the power consumption is ? With HDMI, keyboard, controller, mouse, whatever is planned to be plugged in the front. I just ask since yesterday I had to rebuild my "rig" with 2040 PicoGameVGA. The total power consumption (display/pico/PS2 keyboard/WII controler exceeded the 5V USB PC port/cheap phone charger limits. It is 12V powered now. Regards, Volhout P.S. tip: Move RTC 1e north, to allow e-cap to move away from mounting hole. tip2: route HDMI pair from pin GP15/GP16 zig-zag, so path length equalizes more to other 3 pairs.  Edited 2024-10-17 16:55 by Volhout PicomiteVGA PETSCII ROBOTS |
||||
| Mixtel90 Guru Joined: 05/10/2019 Location: United KingdomPosts: 6778 |
According to my little USB ammeter (which has a 3-digit display and appalling resolution): In 640 is 150mA, in 1024 and 1280 it's 180mA Adding a "generic" USB controller is probably adding 10mA or so. These figures are with a USB dongle on one port. Power is supplied by the PC. According to the USB spec a 1.1 0r 2.0 port must be able to supply 500mA - although that can be shared between ports on the same hub, I believe. I could do to make up a little USB breakout "thing" to allow a meter to be connected and with a bypass switch for it. Somehow I never seem to get round to it. ------------ I just realized early this morning why Peter routed GP23 to the GPIO port. It's doing nothing when the switcher is disabled. I'll copy that and leave the front LED on GP25. Thanks for the comments. :) . Edited 2024-10-17 17:09 by Mixtel90 Mick Zilog Inside! nascom.info for Nascom & Gemini Preliminary MMBasic docs & my PCB designs |
||||
| matherp Guru Joined: 11/12/2012 Location: United KingdomPosts: 9104 |
Mick What is your system for connecting and disconnecting the USB hub and how are you getting the USB host signals to it in the first place? |
||||
| Mixtel90 Guru Joined: 05/10/2019 Location: United KingdomPosts: 6778 |
There is a "Mini" micro USB plug plugged into the Pico. D+ and D- are on two wires from that to a header soldered onto the hub. You can simply unplug the "mini" plug and plug the programming lead in. Now, whether there is enough room to do that with the front panel in place I don't yet know. Mick Zilog Inside! nascom.info for Nascom & Gemini Preliminary MMBasic docs & my PCB designs |
||||
| Mixtel90 Guru Joined: 05/10/2019 Location: United KingdomPosts: 6778 |
I'm considering making up a Pico2 with 2 additional pins on each side at the USB end, making it a 44 pin chip. The pair at the VBUS side would go to D+ and D-, the other pair would go to GP23 and GP25. The whole thing could be unplugged as one then. :) ============================= I just added a Schottky diode from the 5V input to the 5V rail. The 5V rail then goes to VSYS. I can then use the on-board diode to power everything from the programming plug with no danger of reverse-powering out from the 5V input. In fact, the 5V input isn't needed during programming now. The hub is powered directly from the 5V rail. . Edited 2024-10-17 19:14 by Mixtel90 Mick Zilog Inside! nascom.info for Nascom & Gemini Preliminary MMBasic docs & my PCB designs |
||||
| Mixtel90 Guru Joined: 05/10/2019 Location: United KingdomPosts: 6778 |
This is the "mini plug" from AE. Useful when you don't want the full depth of a normal plug. Mick Zilog Inside! nascom.info for Nascom & Gemini Preliminary MMBasic docs & my PCB designs |
||||
| Bleep Guru Joined: 09/01/2022 Location: United KingdomPosts: 509 |
Hi Mick, If you do ever get this board made and have a spare, I'd be interested in buying one off of you, I think I probably already have most of the modules to make it work. :-) Regards Kevin. |
||||
| Sasquatch Guru Joined: 08/05/2020 Location: United StatesPosts: 362 |
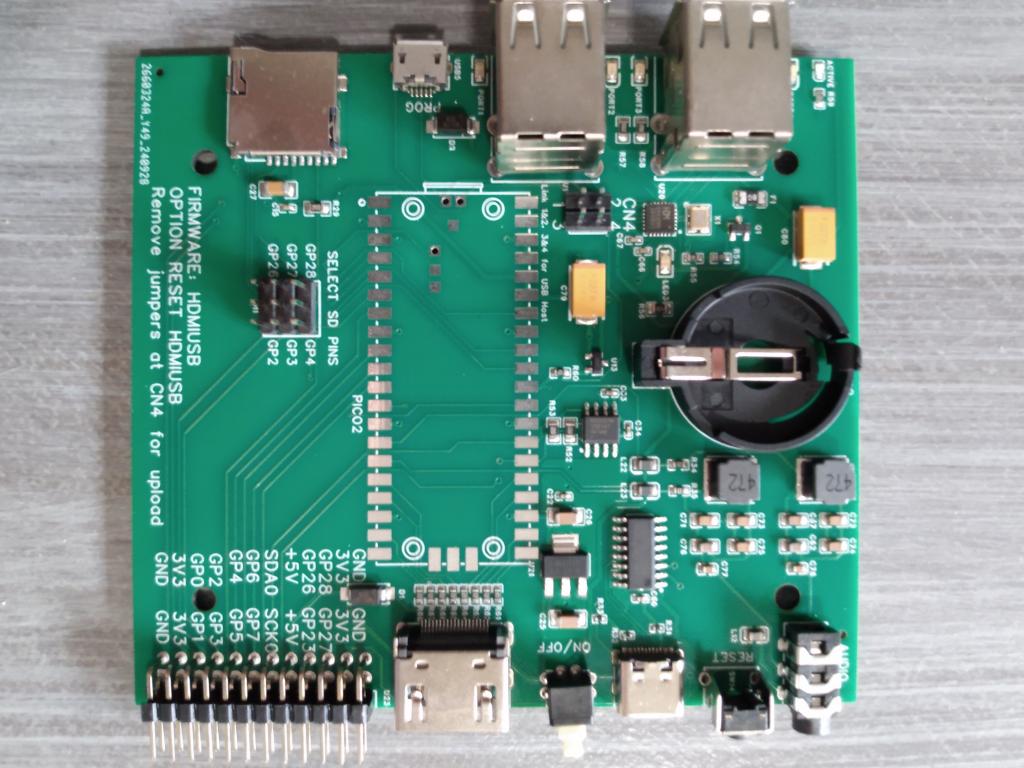
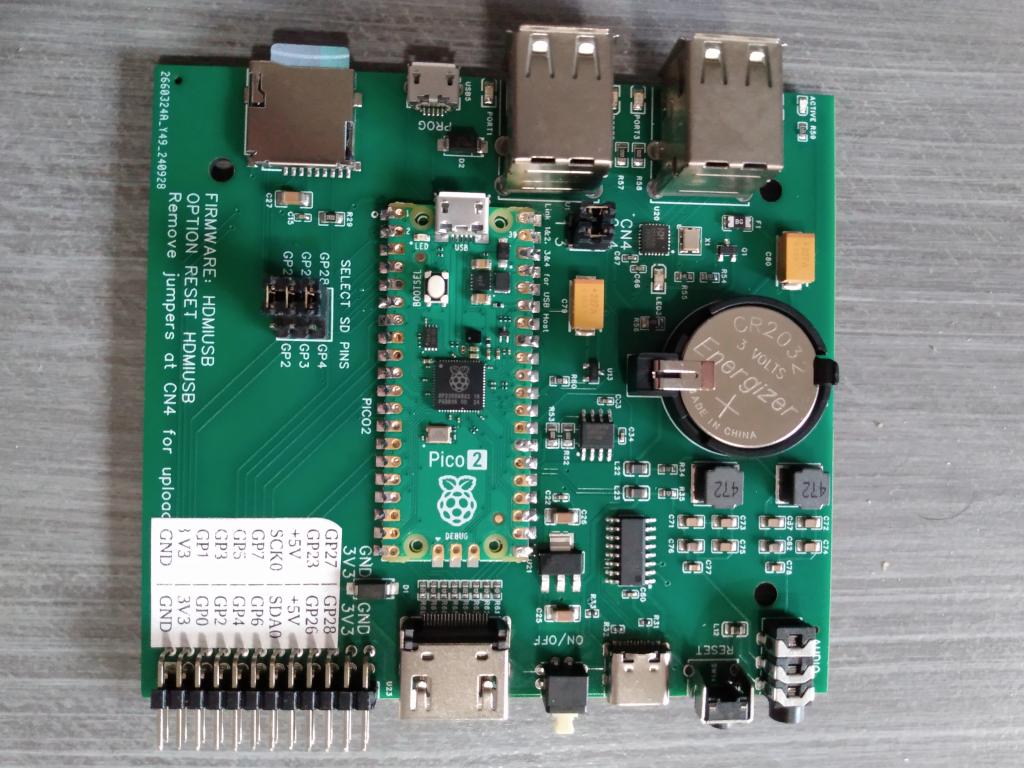
 My Pico2 Motherboards arrived from JLCPCB today! My Pico2 Motherboards arrived from JLCPCB today!  Note the sticker to correct the misprinted silkscreen near the I/O connector. For those who already reserved a board, check for your PM here on TBS!   Edited 2024-10-18 06:31 by Sasquatch -Carl |
||||
| Mixtel90 Guru Joined: 05/10/2019 Location: United KingdomPosts: 6778 |
Would you want to solder your own DVI connector and 0805 resistors? I'm just considering doing a "full DIY" version for those who can't get hold of the Adafruit module. By the way, I used 0603 SMD capacitors in the audio circuit on Gamma, just to see if I could get them on the pads. You can - and they are a lot less bulky. I'm not sure how happy people are with SMD soldering though. Mick Zilog Inside! nascom.info for Nascom & Gemini Preliminary MMBasic docs & my PCB designs |
||||
| Bleep Guru Joined: 09/01/2022 Location: United KingdomPosts: 509 |
Hi Mick, I already have a spare Adafruit DVI/HDMI board, I got 2 early on. :-) I have soldered SMD components, but again I already have wired resistors, caps and inductors, but whatever you decide on, assuming you get it made and have some spare. Regards, Kevin. |
||||
| Mixtel90 Guru Joined: 05/10/2019 Location: United KingdomPosts: 6778 |
OK. I've made a few changes now, including a version for DIY HDMI socket soldering. :). I'll start another thread when I've got the last bits sorted. I don't think I should clutter this one up. :) Mick Zilog Inside! nascom.info for Nascom & Gemini Preliminary MMBasic docs & my PCB designs |
||||
| mclout999 Guru Joined: 05/07/2020 Location: United StatesPosts: 469 |
I have a problem with the board I got Monday from Sasquatch. I updated to RC 9. I was just using a keyboard to get used to it and then today I tried a USB mouse and no matter what mouse I use (10 of them from MS mouse to a generic E-wast mouse) It just boot loops until I remove the mouse. Does anyone have an idea of why this might be? I also have a generic USB SNES gamepad like the ones I have seen on this thread, I think, and though I have not tested it in a app it is recognized but shows up as 2 devices. That's kind of odd as well. I need a test program for the gamepad. Does anyone have something to test them or a game that should work as a test? Edited 2024-10-23 03:59 by mclout999 |
||||
| matherp Guru Joined: 11/12/2012 Location: United KingdomPosts: 9104 |
Please try powering up the Pico board before plugging in the keyboard and the mouse |
||||
| mclout999 Guru Joined: 05/07/2020 Location: United StatesPosts: 469 |
I have tried that several times. OK, this is what I get randomly now it seems. I plug in just the KB shows as channel 1 and generic gamepad shows as channel 2, even though it is not plugged in. I then plug it mouse and sometimes it will not boot loops but if it does not it does not show up as any channel. The mouse lights up and flashes like it should. If I then plug in my generic gamepad a second generic gamepad shows up on channel 3. I should add that it will soon after it let me plug in the mouse it begin to boot loop if I reset it. |
||||
| matherp Guru Joined: 11/12/2012 Location: United KingdomPosts: 9104 |
OK, I think there are two things going on Some keyboards have a second USB device. The firmware as written assumes anything that isn't a keyboard or mouse is a gamepad. This was designed to allow gamepads with different PID/VID to work to the extent possible. This is completely benign. The boot loop is probably being caused by the reset controller chip U13. It is seeing the voltage sag when the USB hub switches power to the external devices and is triggering a reset. You can easily disable this by removing R60. I'll investigate more tomorrow |
||||
| Sasquatch Guru Joined: 08/05/2020 Location: United StatesPosts: 362 |
I had no problems with that board using USB Keyboard and Generic SNES style USB controller for testing. I had forgot that the firmware supported a mouse, so I hadn't tried it until just now. I currently have a USB keyboard, mouse and game-pad connected and haven't seen any issues after multiple resets. I am still on the last build of RC8, but I doubt that makes any difference. What kind of power supply are you using? If you are using a computer or laptop USB port for power sometimes they are current limited. Edit: Interesting, I tried to insert a USB power meter between my computer and the Pico2 board, now I get the boot-loop. When I remove the meter, works fine. Not sure what is going on here. The power meter no doubt has some internal resistance to measure the current. Perhaps the reset controller is too sensitive? I will try disabling it as Peter suggested. I'll do more testing tomorrow when I have some time. Edited 2024-10-23 08:11 by Sasquatch -Carl |
||||
| phil99 Guru Joined: 11/02/2018 Location: AustraliaPosts: 2135 |
I think it was mentioned long ago, some USB cables have too much resistance so check the voltage at the end with every thing plugged in. Also even if the voltage seems ok, whenever anything with a supply bypass capacitor is plugged in the voltage may dip low enough to cause a reset. |
||||
| matherp Guru Joined: 11/12/2012 Location: United KingdomPosts: 9104 |
I've managed to replicate the boot loop by using a c..p USB-C cable. So the take aways are: 1: If you are having the problem try a better cable and/or power source OR remove R60 2: I'll change the reset controller in the design to one with a lower reset voltage that is in stock at JLC i.e. the MAX809R (C19631717) |
||||
| matherp Guru Joined: 11/12/2012 Location: United KingdomPosts: 9104 |
New design files V1.2 Gerber_PCB1_2024-10-23.zip BOM_Board1_PCB1_2024-10-23.zip Edited 2024-10-23 19:35 by matherp |
||||