
|
|
Forum Index : Electronics : Workbench height?
| Author | Message | ||||
| Gizmo Admin Group Joined: 05/06/2004 Location: AustraliaPosts: 5182 |
Hi Guys Building a new electronics workshop room. Currently my workbench is in a corner of my shed. Its dusty, and it gets very hot in summer. Also its a mess, because its cramped and I use the bench for other ( car ) projects. 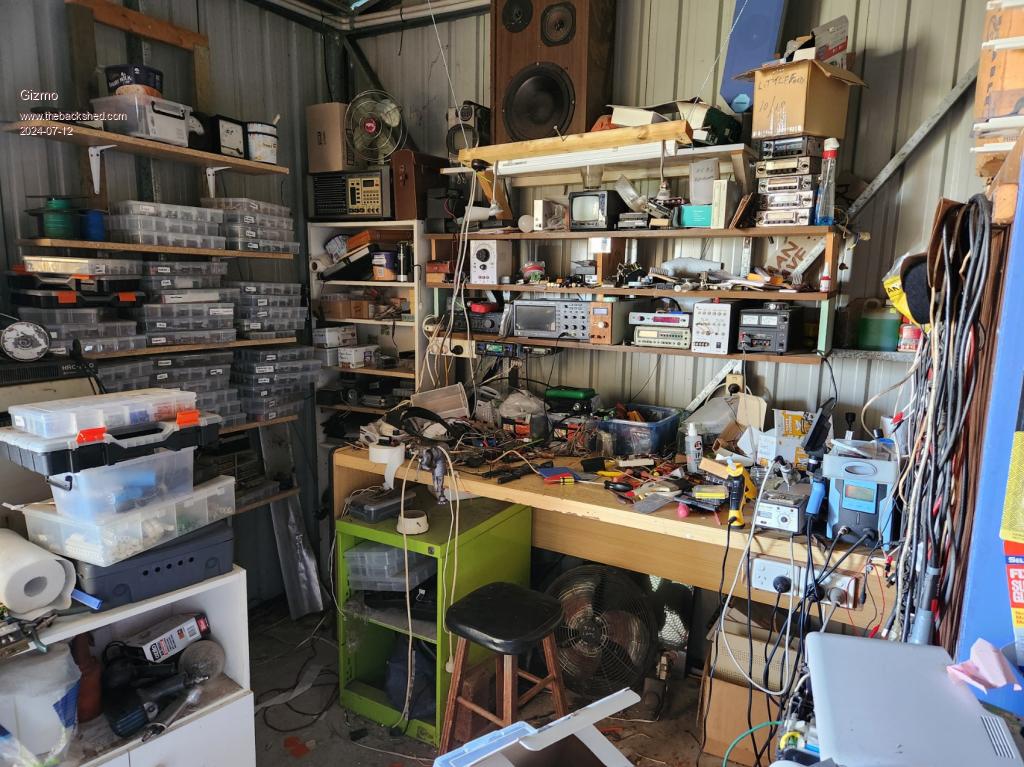 So building a dedicated electronics room in the shed. It will double as storage space above the room. Its going to be lined, insulated and air conditioned, Lots of power points and lighting, plus I'll paint the walls white to brighten it up. 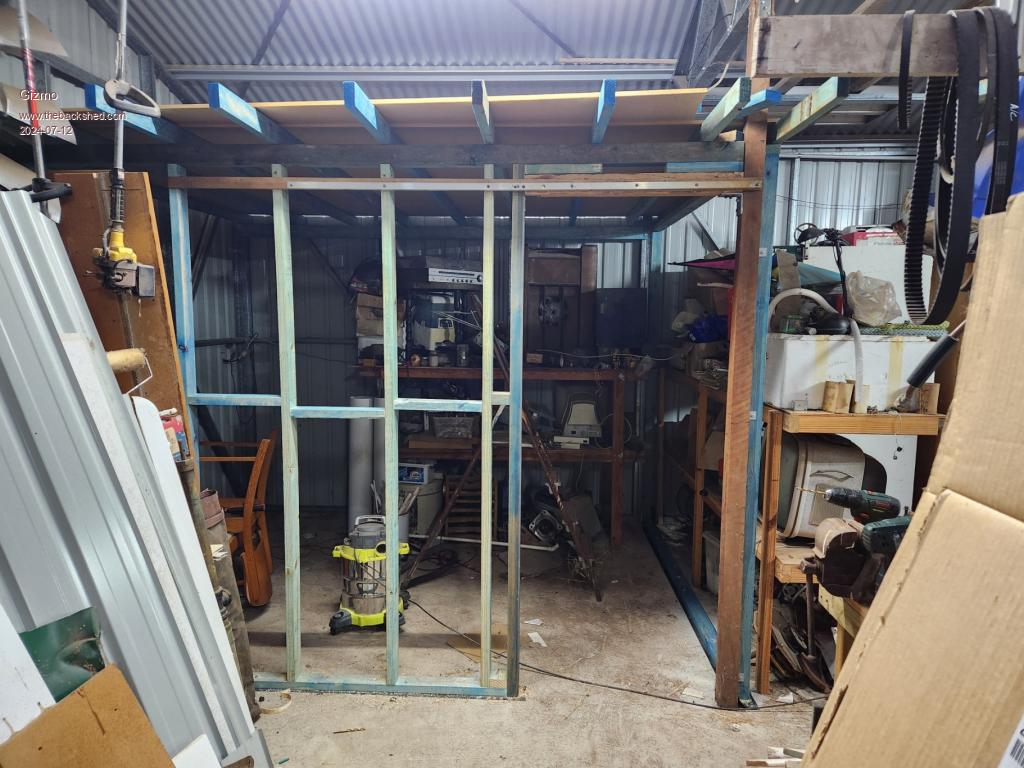 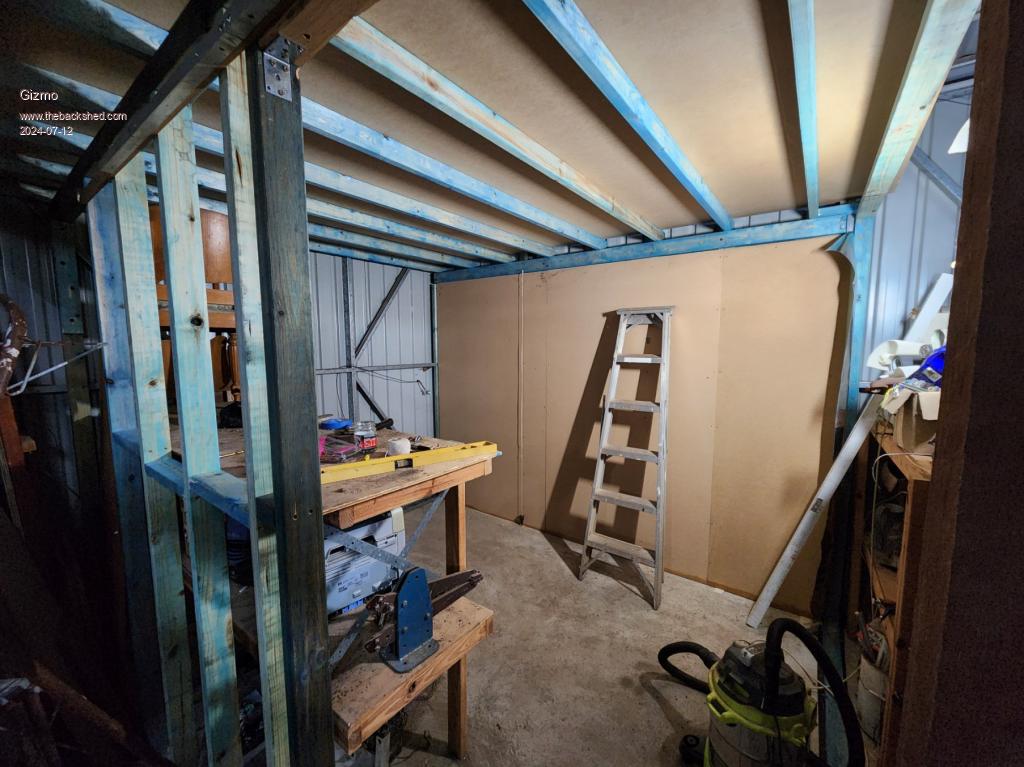 So looking for suggestion on the work bench. It will be 3 meters long, down the far wall. The rest of the room is for shelving and cable hangers. My current bench is high enough for a stool seat, or to stand at for quick jobs. Thats what I'm used to. But should I go for a table height, and use a office chair? Maybe I can have two levels, a bench and a table. The dept from front to back, currently using 850mm, but tempted to increase that to 950mm. The shelves for the test gear above the bench need to be 400mm deep to fit some of my larger test gear, a bit of overhang I need to allow for. What do others find work for them? Glenn The best time to plant a tree was twenty years ago, the second best time is right now. JAQ |
||||
| tgerbic Senior Member Joined: 25/07/2019 Location: United StatesPosts: 119 |
Not that I have an opinion but... Don't make the same mistakes others have made. The bench should be easy to use and all displays should be easy to read. Bench height. Here in the US, tables are 30" (76cm) tall. I found after decades of putting in benches where I have lived that this is to low. Even for computer desks this is to low for many reasons. I would suggest about 33" (about 84cm). Once you start working on boards on a shorter bench, you may find your neck and back getting sore or you will be spending too much time looking down. You may also want to make a simple table about 15cm tall, about 35cm wide and about 20cm deep (depending on what you work on), with enough weight so it does not slide around while you work on it. There will be times you want to look at boards really close like probing and soldering SMD. Having a distinct second bench setup differently will make a lot of sense, even if it sits right next to the main bench. Bench depth. It should be between 37" (94cm) and 38" (97cm). 37cm might turn out to be the best size. It is based on the ability to reach the test equipment controls when sitting down. Bench length. Longer is usually better, but two things happen with long benches. Stuff gets too far away to reach and you need to slide the chair around to get to things. Also stuff tends to collect in the less used part of the bench which, over time, will begin to encroach on your normal work area. My current bench is about 154cm wide. It could be a little wider but test equipment begins to get too far away to reach when sitting down. Shelves. You will want to design around the equipment you use. I have a lot of scopes and HP equipment. You will also want no test equipment sitting on the bench as this becomes a problem with stuff bumping it or inability to attach wires/probes or reach knobs/buttons. It also keeps stuff that tends to migrate to the back of the bench from collecting around the test equipment. Additionally it allow some room to shove your soldering or desoldering station back out of the way and easy pullout when you need it. The area under the first shelf, on the bench, could hold some storage boxes or fixtures like resistive loads or test speakers. Nothing should be mounted to the bench but rather mounted to the far left or right bottom of the first shelf. You should be able to easily remove everything sitting on the bench to clean it. I designed my bench to allow me to sit at the middle of the bench and reach all the test equipment controls, I succeeded for about 95% of the equipment. I have to stand for some of the analyser top controls on the top shelf right corner. I have three shelves. First shelf is most used equipment. Since I have an analog VOM, it is directly in front of me to remove most reading errors. Some equipment at the edges are turned slightly to point more toward me for a direct view. Much less used analog meters are sitting at this level but off to the right. Second shelf up is the rest of the commonly used equipment. Since the shelf distance is further away, I put longer equipment on this shelf, and anything shorter is set to stick out as far as the longer equipment. I can reach all of this without getting up or moving my chair. Third shelf is different. I have all the rest of the long equipment there, such as oscilloscopes and spectrum analyzers. The long HP signal generator and frequency counter sit on top of the scopes. The shelf is angled down so when I am sitting in the chair, I am looking directly at the face of the scopes. They are easy to reach, don't experience glare from the overhead lights and allow standard probe lengths to reach anything on my bench. The shelf is re-enforced down the middle to make sure it does not bow under the weight. The shelf is also only 33cm deep allowing the test equipment to sit on it without needing or using the feet. The feet hang over the back and there are heavy wire attached to the back of the equipment that raps under the shelf and around screw shanks sticking down under the shelf. Very secure but easy to remove. I have a 2X6 outlet strip screwed under the back of the shelf to plug the test equipment power into (lots of room at the back bottom of the third shelf. The bench and shelves are about 3cm from the wall to allow backs of equipment to hang over and provide room for cords and cables. The sides of the shelves are attached with metal L brackets to the wall to keep the shelves from leaning forward under their weight. Tool storage. To the left of the edge of the bench, I have a 60cm X 8cm board with lots of various sized holes to hold lots of tools. Holes based on actual tools. I try to keep all tools off the bench. I also have a three drawer roll around cabinet on the right to hold larger tools, wire stripper, wrenches, crimpers, and in the second drawer, sprays, flux and things like that. Bench power. I would suggest outlets at both ends under the desk edge using strips with power switches. You want to be able to turn things on and off while working on them, and you need to keep the power cords off the bench and off your lap. I would suggest you use a two switch power switch feeding the bench, from an easy reach position. One switch turns on the power to the test equipment and the other turns on the power to the bench outlets. If you don't need the test equipment on, you can turn it off. Great when you are just charging things off the outlets or letting something burn in over night. I mounted an isolation transformer under the bench that is switched. Also mounted a variac on the front left corner of the desk as it comes in handy for many things but is out of the way. Lighting. I have a dual 122cm florescent fixture converted to LED lights just about straight above my head when sitting near the ceiling. Lights up what you can see when sitting and at a position that causes no glare on the equipment displays. Though I have lots more equipment, it is stored in a walk-in closet elsewhere that has very deep shelving, about 80cm. If you have lots of equipment, make a place out of the way to store it, not on shelves above the bench (inconvenient to get) or under the bench (could get kicked). Under the bench is space for some simple large drawer boxes to store bulky things. This bench has been in place 25 years and survived a couple of 4s, 5s and one 6 earthquake with nothing falling or breaking. Pretty long winded but I have seen dozens of bench photos over the years which look very inconvenient to use. Examples are equipment you cannot reach while sitting down or see the display/screen. Glare making it hard to read displays or benches too far from the wall because of long equipment clearance. Another example is people putting test equipment on the actual bench, taking up lots of room and causing clutter to accumulate. Then there are all the desk lamps or ones swinging around in the way. I would also advise you line the left wall with 50 drawer cabinets three layers deep from the ground up (on a thick bottom board so you can sweep the floor and nothing will roll under). You should be able to reach resistor, caps, semis and transistors just by swiveling to the left and opening a drawer. I have seen too many people have to get up and hunt through miscellaneous boxes to find parts. What a waste of time and energy. Well so much for my advice. |
||||
| tgerbic Senior Member Joined: 25/07/2019 Location: United StatesPosts: 119 |
Here are some quick pictures of my messy bench. Note the slanted top shelf. 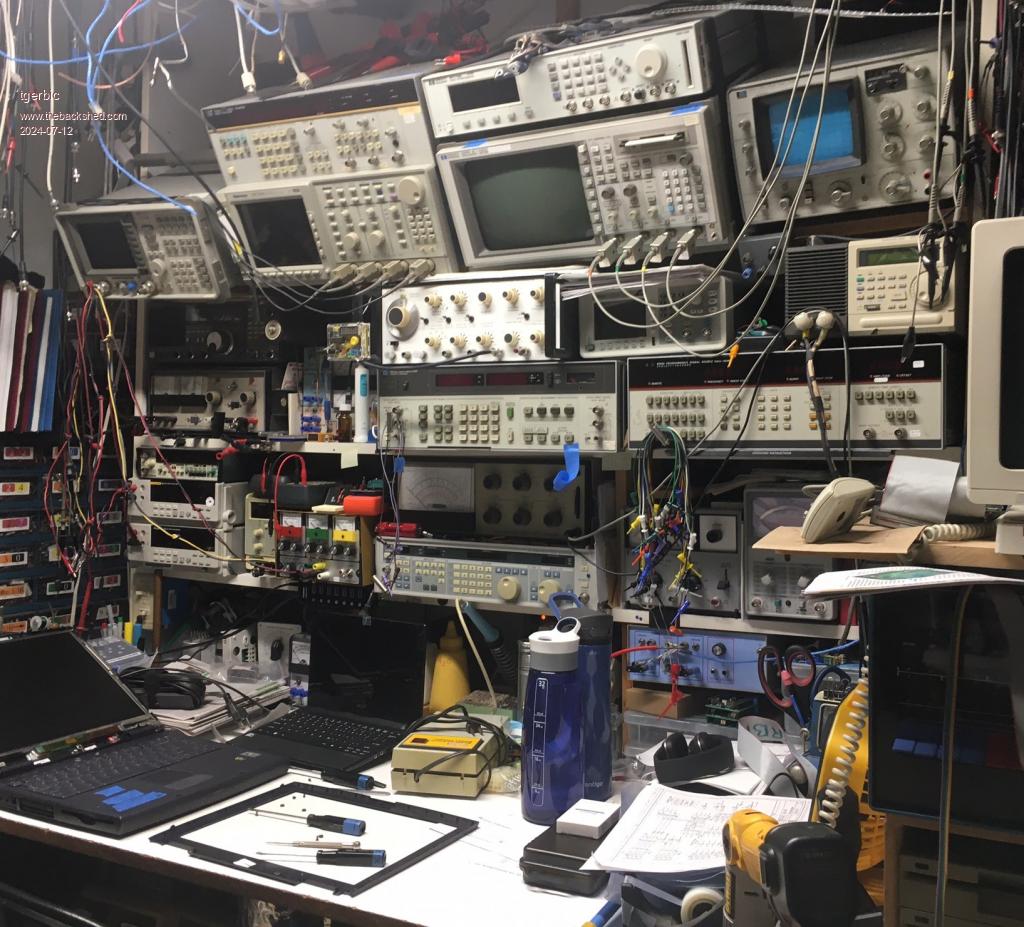 View while sitting down. What you cannot see above in this picture are ~4cm X 4cm boards sticking out horizontally from the top of the shelf vertical boards that stick up almost to the ceiling. There are three of these. I have horizontal dowel pins about 15mm diameter going between them with spools of wire. If I need some red 20G wire or some yellow #26 wire, I can get up and just pull down off the spool and cut a piece. This keeps me from needing a box or drawer to store spools of wire in. It is a good use for the space above the bench near the ceiling that normally would not get used. 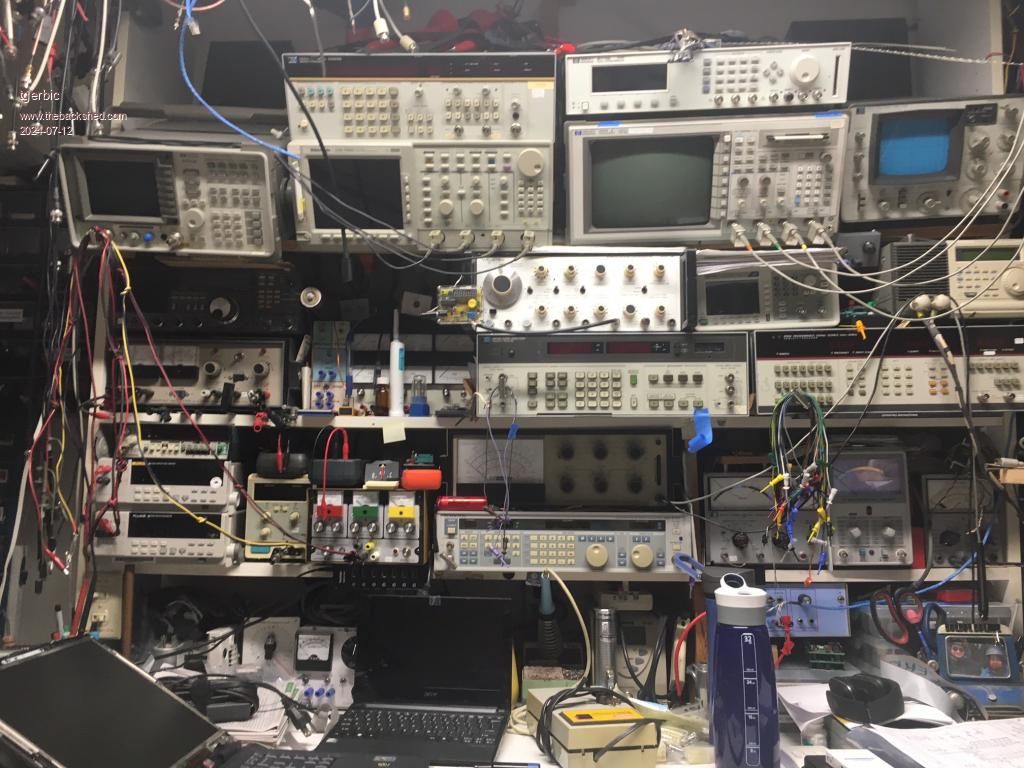 Convenient to reach storage. I pull out parts as I build things. Note the variac and watt/volt meter on the left corner of bench. Further down the bench leg is the switched isolated AC socket. Sometimes you really need an isolation transformer. 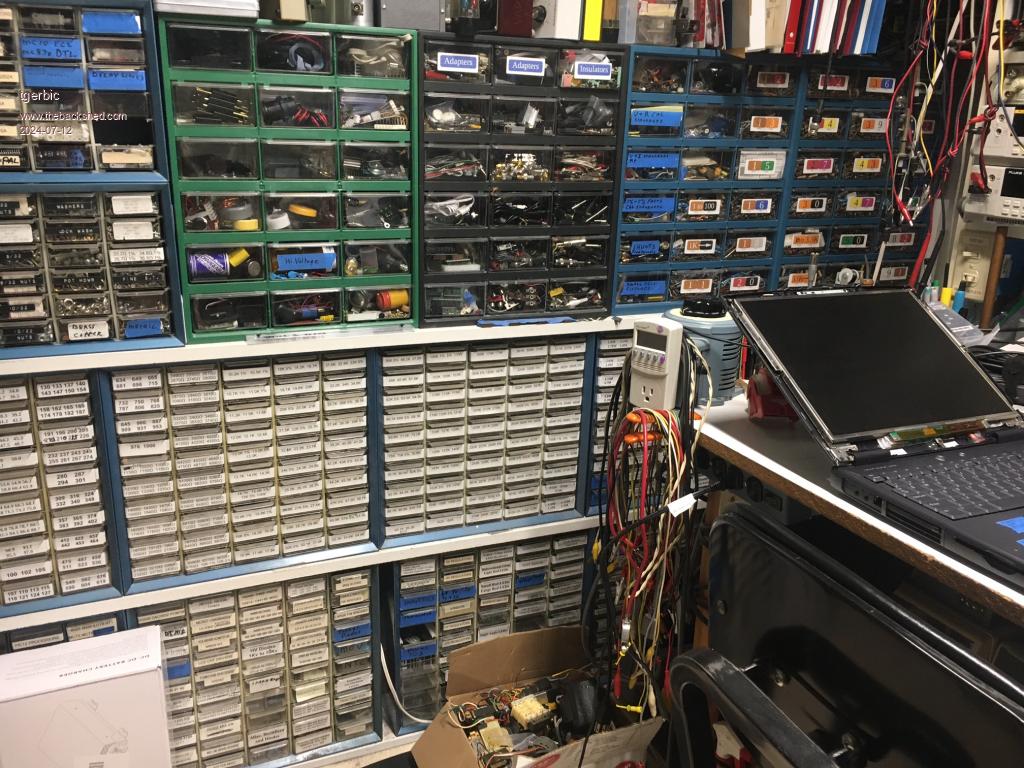 In all fairness I do have a 250cm closet filled with parts boxes to the right with things well organized for larger parts like connectors, pots, gang switches, memory simms, large capacitors, packages of ICs, etc., but I need to pull from them less often. Your situation will probably be different but getting organized up front makes the rest of the hobby enjoyable. |
||||
TassyJim Guru Joined: 07/08/2011 Location: AustraliaPosts: 6538 |
My bench height for sitting down is 720mm. The standing one in the shed is a lot higher but it will have to wait til tomorrow to measure it. I also have a drafting table which is nice to use on occasions. Don't forget the exhaust fan for the soldering station. A window would be nice so you can see the world go by. Jim VK7JH MMedit |
||||
| tgerbic Senior Member Joined: 25/07/2019 Location: United StatesPosts: 119 |
Having a window is a nice touch. My lab took over a spare bedroom so I have natural light and can open the window when it is nice or if doing a lot of soldering. I don't have an exhaust vent but there is a battery powered camping fan in the top photo (yellow at the lower right) that has a low setting which blows across the desk. I use a small office chair with rollers that has some height adjustment. The floor is sheet vinyl so easy to clean and roll the chair around. Forgot to mention there are vertical boards that keep the first and second shelf from bowing which are the same depth as the shelves. They are about 20mm thick and are not attached so they can be moved if I change the test equipment around. Right now they are placed on either side of the Heathkit VOM. |
||||
| KeepIS Guru Joined: 13/10/2014 Location: AustraliaPosts: 2177 |
Hi Glenn, I built a workbench 8 years ago, 3m long x 920mm deep and 920m high, I included a slightly recessed combined bottom storage shelf and foot rest, at 240mm from the floor. 950mm depth would be good, but I didn't have the room. The shelves above the workbench are 420 deep with a separate full width movable intermediate shelf sitting on the bench in 3 sections, it's 300mm deep. The bench is very heavy duty with six 80 x 100mm legs - heavy 25mm pine top with a thick floor vinyl top cover. Zero movement or vibration. I'm 188cm and it's a good working height for me standing up, my wife is 164cm and likes the height as well, comfy padded stools are what we use. Computer work station is separate but if you can get a comfy stool with a back rest then it would work for a Computer as well, bench foot rest helps. NANO:Inverter V 8.2ks - Linux AvrDude GUI script V4.1 |
||||
| Gizmo Admin Group Joined: 05/06/2004 Location: AustraliaPosts: 5182 |
Thanks guys, some good tips in there. I didnt even think of a exhaust fan for soldering, but will add one now. tgerbic that test gear setup would give me nightmare's, the fear of it falling on my head  One tip I'll add, loop pile carpet you can throw on the bench when you dont want to scratch something. When I fixed stereo's and TV's for a living, the carpet was a permanent fixture. You could place the TV face down and not worry about it getting scratched. Plus it stopped screws rolling away. Never had a problem with static buildup, but I was living in the tropics at the time and it was always humid. Glenn The best time to plant a tree was twenty years ago, the second best time is right now. JAQ |
||||
| tgerbic Senior Member Joined: 25/07/2019 Location: United StatesPosts: 119 |
No risk of the equipment falling forward. As I said it has survived several severe California earthquakes with nothing moving. The equipment on the first and second shelf are sitting flat. The third shelf is slanted but the equipment is attached at the rear to the rear of the shelf. The equipment sitting on top are strapped to what it is sitting on. I believe the shelves and the uprights are 12" (310mm) deep Melamine wood. The third shelf, since slanted is 13" (330mm) deep. The shelf uprights are part of the bench rear legwork and are attached near the top to the wall using 100mm x 100mm steel L brackets. Would need a crowbar to pull the shelf assembly away from the wall. The setup is really strong and the usability is much better than with just flat shelves. The extended third shelf allows a deeper table work surface to be used while being able to reach the test equipment while sitting down. |
||||
| Gizmo Admin Group Joined: 05/06/2004 Location: AustraliaPosts: 5182 |
Finished at last, more or less. 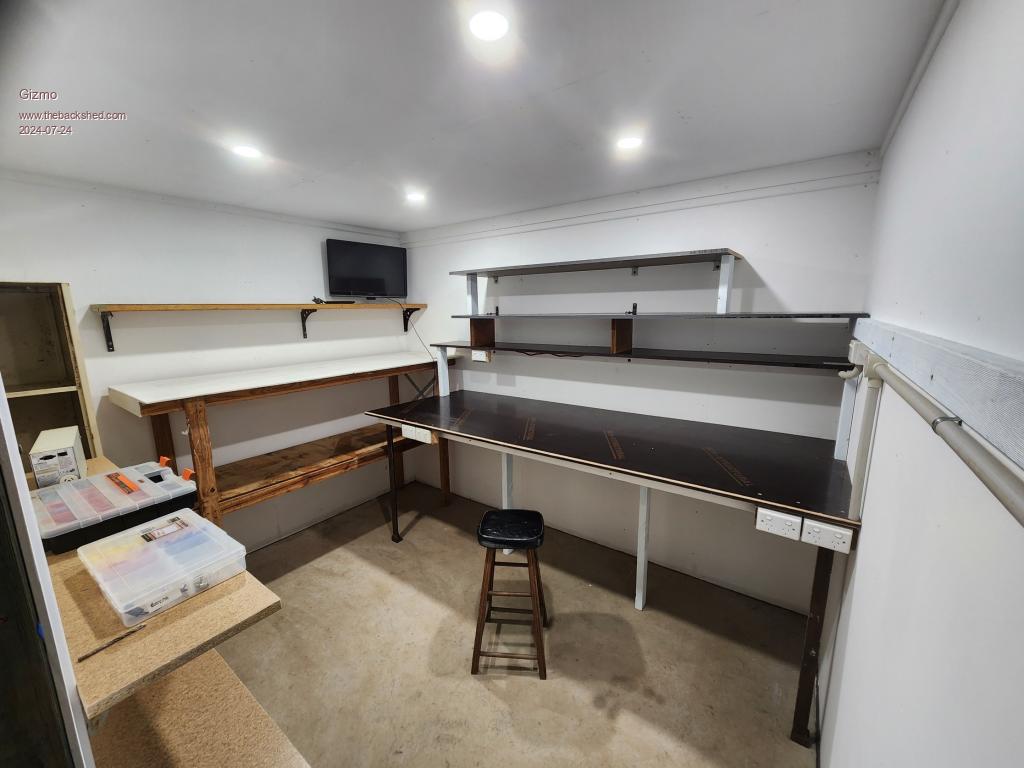 Still need to add a few shelves, and touch up some of the paint where I stuffed up in places. Where possible I used timber I had lying around. The bench is 18mm form ply, very tough but a black slippery finish and difficult to paint, so black it is. Now I can move in  Glenn The best time to plant a tree was twenty years ago, the second best time is right now. JAQ |
||||
| rogerdw Guru Joined: 22/10/2019 Location: AustraliaPosts: 955 |
Wow, great job Glenn. Bit of a difference to the first photos. Good luck with working out where everything goes now. Cheers, Roger |
||||
| The Back Shed's forum code is written, and hosted, in Australia. | © JAQ Software 2026 |
