|

|
Forum Index : Microcontroller and PC projects : High Spec RP2040 Game PCB
| Page 1 of 3 |
|||||
| Author | Message | ||||
| matherp Guru Joined: 11/12/2012 Location: United KingdomPosts: 9122 |
I've hacked together a schematic for a PCB to support the 8-bit parallel ILI9341 display. The design is completely self-contained - no external modules and all parts are in-stock at LCSC/JLC. Definitely not one to hand-solder  Comments appreciated before I spend any time laying out a PCB. The layout of the schematic is a mess as I should have done all the power circuitry first but instead cut and pasted the working RP2040 circuit from the VGA board. 57d568ea-1766-4e07-acd7-01a577a3f59b.pdf Edited 2023-09-27 02:36 by matherp |
||||
| JohnS Guru Joined: 18/11/2011 Location: United KingdomPosts: 3802 |
What sort of cost is it likely to be from JLCPCB? (For... 5?) Intended for 3.2" display? Or 2.8"? Or... ? Thoughts about its use as a GameMite v2? (Maybe question for Tom et al) John |
||||
| Mixtel90 Guru Joined: 05/10/2019 Location: United KingdomPosts: 6798 |
Is that display connector right? I found a parallel ILI9341 display with a 34-pin connector and it's not like that. Or I'm misreading something.... :) Mick Zilog Inside! nascom.info for Nascom & Gemini Preliminary MMBasic docs & my PCB designs |
||||
| NPHighview Senior Member Joined: 02/09/2020 Location: United StatesPosts: 200 |
Peter - Do you see the W25Q128JVSIQ as a viable alternative to or addition to a micro-SD card socket? Or does the ILI9341 use all the necessary interface lines? Do I understand your motivation correctly that this display, and parallel wiring, will allow for BitBLT operations without using framebuffer & layer, and allow full-color operations? It's incredible what you've done in this environment. Thank you! - Steve Live in the Future. It's Just Starting Now! |
||||
| matherp Guru Joined: 11/12/2012 Location: United KingdomPosts: 9122 |
The display has a card slot and this is wired in the schematic |
||||
| matherp Guru Joined: 11/12/2012 Location: United KingdomPosts: 9122 |
Shamelessly copying off Tom and BigMik  |
||||
| Mixtel90 Guru Joined: 05/10/2019 Location: United KingdomPosts: 6798 |
Very Low Spec (VLS) version - just playing last night. This is a machete hack of Peter's circuit. I definitely prefer his approach. :) Major differences: Uses a surface mount Pico Mounting pillars are at least 15mm, with long tail connector for display, to give battery space (stuck beneath display on sticky pads). Wrong battery connector shown. Uses the SMPS on the Pico but simply shuts it down when charging. Link selects whether SMPS will shut down, used for programming when USB supply is needed. Uses a charger & protection module from ebay. Audio output is crude, headphones only, fixed volume. No expansion connector Backlight is on GP28 RTC would require major modification (remove battery & connector. Fit on wires - probably other way round and over expander chip to give more space for battery. RTC battery would be under PCB, like audio jack). Apologies for the 1206 resistors and caps. :) I probably won't take this idea any further, but it was fun for a few hours. :) Edited 2023-09-28 18:17 by Mixtel90 Mick Zilog Inside! nascom.info for Nascom & Gemini Preliminary MMBasic docs & my PCB designs |
||||
| matherp Guru Joined: 11/12/2012 Location: United KingdomPosts: 9122 |
Just costed the PCB at JLC and for 5 fully built the price is GBP114 + any relevant tax and shipping |
||||
| Mixtel90 Guru Joined: 05/10/2019 Location: United KingdomPosts: 6798 |
I assume the display isn't included in that price but the connector is? (I realize now that my version is actually VLSI - Very Low Spec Indeed. :) ) Edited 2023-09-28 22:35 by Mixtel90 Mick Zilog Inside! nascom.info for Nascom & Gemini Preliminary MMBasic docs & my PCB designs |
||||
| Volhout Guru Joined: 05/03/2018 Location: NetherlandsPosts: 4243 |
Maybe one comment on both designs (and Tom's Game*Mite). According the 8bit guy the PETSCII ROBOTS game is not playable with a NES controller, it requires a SNES controller (more buttons). Not that you would have to design a hardware platform specific for this (not even close to being finished) game development, but there may be an option to sneak in some (2) extra buttons (you basically need 2 X-Y clusters, and few control keys.) The missing keys could connect to the expansion header though...An extra cluster to the right, on a separate board, connecting to the expansion header... I also see a great opportunity for a larger speaker right of the LCD... (slightly larger housing). Volhout Edited 2023-09-29 05:16 by Volhout PicomiteVGA PETSCII ROBOTS |
||||
| Mixtel90 Guru Joined: 05/10/2019 Location: United KingdomPosts: 6798 |
Not on mine. It's the bargain basement "Own Brand" version. If you are *really* lucky you can use START as a shift key to double up on all the others. After all, it's of no use once the game is running, and you've got two thumbs (probably). :) Actually, I've never seen the game or even heard of it. This thread is my introduction to it. I've never been interested in playing arcade-style games so I've simply not bothered. I would certainly never consider playing anything with more than six buttons - that's way over my head. lol The current arrangement used by Peter and myself can handle up to 8 buttons/switches in total as it uses a single i2c input expander. I suppose a second chip could be added if there's more board area. Tom's arrangement could be similarly expanded to make it SNES. Or use the 8 inputs for two 4-way pads and put the control keys on a resistor chain on an ADC input? Edited 2023-09-29 07:26 by Mixtel90 Mick Zilog Inside! nascom.info for Nascom & Gemini Preliminary MMBasic docs & my PCB designs |
||||
| Mixtel90 Guru Joined: 05/10/2019 Location: United KingdomPosts: 6798 |
Oh, go on... I had to see if I could do something like that! Note that this isn't a work in progress, merely an experiment. I stole the basic concept from the Atari Lynx, if anyone remembers that. The board is 160mm by 64mm, so not too big or heavy for a largish pocket. I couldn't fit the RTC on this time as I included an audio amp (fixed max output volume because the speakers are tiny). Speakers are hot-glued into holes in the PCB. Sound will be pretty ropy, but fine for bangs and crashes. :) It should manage at least a 1Ah battery. Most things are surface mounted on the underside of the PCB so that the battery can be fitted between the display and the main PCB.. ==================================== EDIT: If anyone else is crazy enough to attempt this, the SD card slot is obscured by the RH button pad. It *might* just about be possible to use it to load games into A:. but I'm doubtful. A few mods done: Buttons moved upward to give better (I think) handling. Micro SD card connector added (SMD. sorry). Speakers moved downwards slightly to stiffen rear edge. RTC and separate battery added. This requires modifying the RTC module to make it almost SMD. Not horrendously difficult. Edited 2023-09-30 20:35 by Mixtel90 Mick Zilog Inside! nascom.info for Nascom & Gemini Preliminary MMBasic docs & my PCB designs |
||||
| matherp Guru Joined: 11/12/2012 Location: United KingdomPosts: 9122 |
Mick I really like that layout. I've ordered a couple of my design. Once I get them back I can check all the new elements of circuitry - particularly the power section which is all new to me. Assuming all OK I think I will modify it to your layout and then release the gerbers into the wild. Can you let me have the outline as a dxf? |
||||
| Mixtel90 Guru Joined: 05/10/2019 Location: United KingdomPosts: 6798 |
I can't export as DXF from SL6, unfortunately. :( BMP, JPG, EMF, GIF and Gerber, of course. Mick Zilog Inside! nascom.info for Nascom & Gemini Preliminary MMBasic docs & my PCB designs |
||||
| Mixtel90 Guru Joined: 05/10/2019 Location: United KingdomPosts: 6798 |
This should work, Peter. I redrew it on CAD. pergame-2 outline.zip =========================== Another slight mod. GP27 was sitting there all alone and I felt sorry for it. Now it lights the red half of a Red/Green LED, turning off the green half that indicates Power On. Here endeth the design. I've run out of pins now. :) Edited 2023-09-30 22:40 by Mixtel90 Mick Zilog Inside! nascom.info for Nascom & Gemini Preliminary MMBasic docs & my PCB designs |
||||
| matherp Guru Joined: 11/12/2012 Location: United KingdomPosts: 9122 |
Perfect - thanks |
||||
| Mixtel90 Guru Joined: 05/10/2019 Location: United KingdomPosts: 6798 |
Couldn't resist.... Added a headphone socket and drew a circuit. :) pargame prelim.zip ===================== EDIT: And another slight tweak. I've managed to add another RC stage to the audio filter. I hope you enjoy soldering 1206 SMD bits. :) Edited 2023-10-01 18:39 by Mixtel90 Mick Zilog Inside! nascom.info for Nascom & Gemini Preliminary MMBasic docs & my PCB designs |
||||
| matherp Guru Joined: 11/12/2012 Location: United KingdomPosts: 9122 |
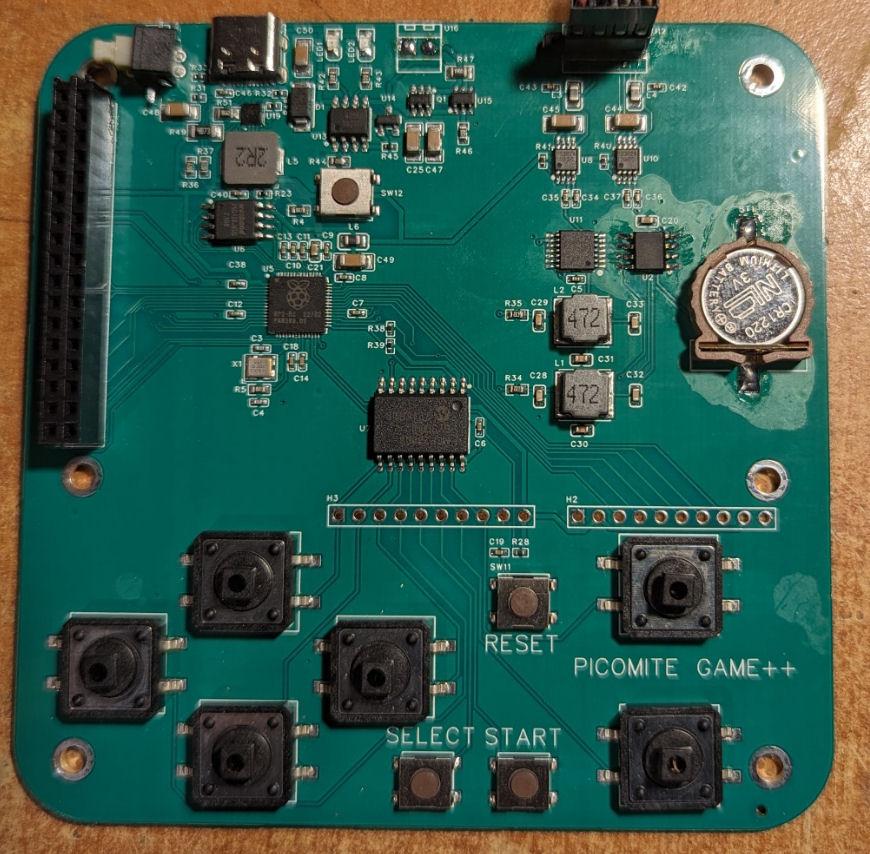
It works  Demo here Speakers out of a defunct laptop Just a couple of silk screen omissions and the switch was connected incorrectly. Otherwise everything works pretty much perfectly out of the box. The charging/battery protection and load sharing all seems to work but need a soak test. At the moment the digital pot is upside down so &HFF is off and &H00 is full volume. In addition I need to lower the audio signal before the pot as currently the amp clips at only 33% volume. CLS I2C2 write &H20,0,2,6,&HFF 'set pullups on all inputs I2C2 write &H20,0,2,1,&HFF 'Invert all outputs for positive logic I2C2 write &H20,0,2,2,&HFF 'Set interrupt on change for all inputs I2C2 write &H20,0,2,5,0 'Set control register to defaults I2C2 write &H28,0,2,16,&HD0 'Set left channel to max usable volume I2C2 write &H28,0,2,0,&HD0 'Set right channel to max usable volume Play modfile "B:/gslinger" SetPin gp22,intl,myint 'set up an interrupt for the port expander FRAMEBUFFER create FRAMEBUFFER write f Do r=Rnd *255 g=Rnd *255 b=Rnd*255 Circle Rnd*MM.HRes,Rnd*MM.VRes,Rnd*60,,,0,RGB(r,g,b) FRAMEBUFFER blit f,n,0,MM.Info(FONTHEIGHT),0,MM.Info(FONTHEIGHT),MM.HRes,MM.VRes-MM.Info(FONTHEIGHT) Loop ' Sub myint Do While Pin(gp22)=0 'clear any H/W interrupts that may happen while still processing I2C2 write &H20,1,1,9 I2C2 read &H20,0,1,a% process a% Loop End Sub Sub process(a%) Local b%=MM.Info(FONTWIDTH) I2C2 write &H20,1,1,9 I2C2 read &H20,0,1,a% FRAMEBUFFER write n If a% And 1 Then Text 0,0,"Up " Else Text 0,0," " EndIf If a% And 2 Then Text 6*b%,0,"Down " Else Text 6*b%,0," " EndIf If a% And 4 Then Text 18*b%,0,"Right " Else Text 18*b%,0," " EndIf If a% And 8 Then Text 12*b%,0,"Left " Else Text 12*b%,0," " EndIf If a% And 16 Then Text 24*b%,0,"Select" Else Text 24*b%,0," " EndIf If a% And 32 Then Text 30*b%,0,"Start " Else Text 30*b%,0," " EndIf If a% And 64 Then Text 39*b%,0,"B " Else Text 39*b%,0," " EndIf If a% And 128 Then Text 36*b%,0,"A " Else Text 36*b%,0," " EndIf FRAMEBUFFER write f End Sub  Latest schematic 5314d765-309d-4781-98ea-4117f78ea136.pdf Edited 2023-10-12 04:25 by matherp |
||||
| Mixtel90 Guru Joined: 05/10/2019 Location: United KingdomPosts: 6798 |
Nice, Peter. I'm guessing that that's for the 3.2" display? The 2.8" one that I found had no fixing holes at the connector end (not enough height for them). Mick Zilog Inside! nascom.info for Nascom & Gemini Preliminary MMBasic docs & my PCB designs |
||||
| matherp Guru Joined: 11/12/2012 Location: United KingdomPosts: 9122 |
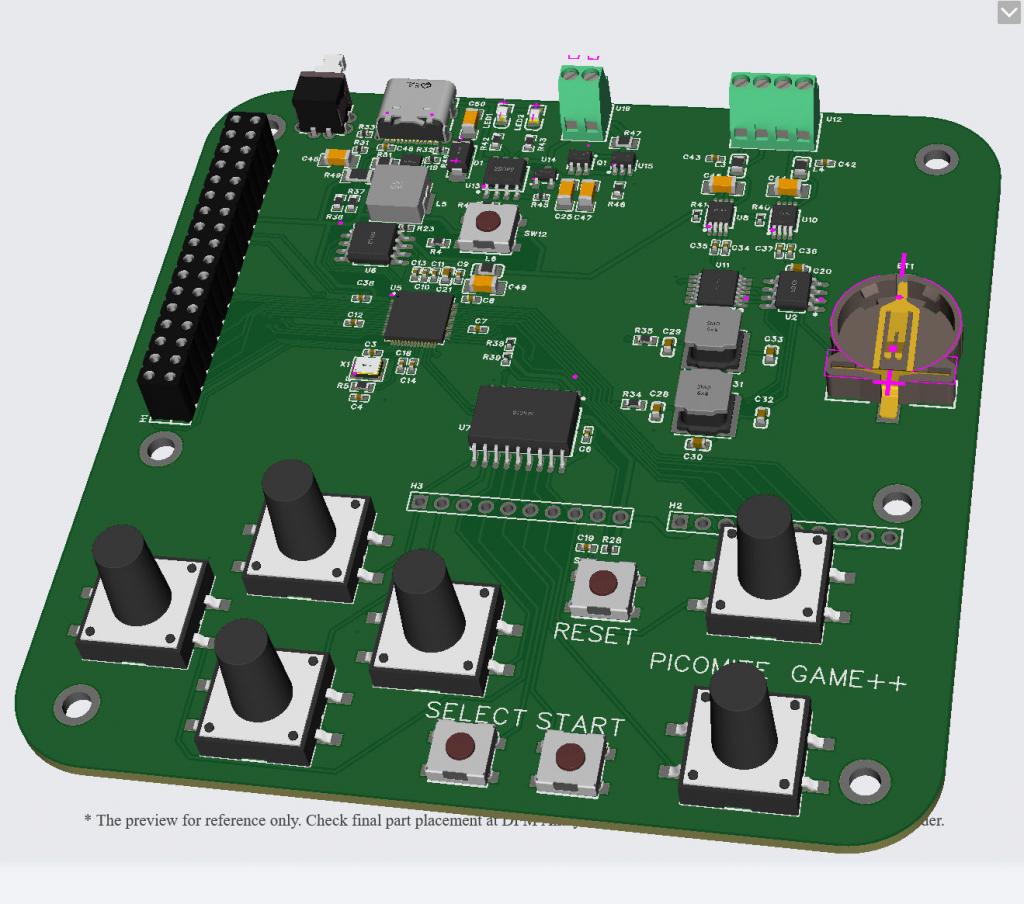
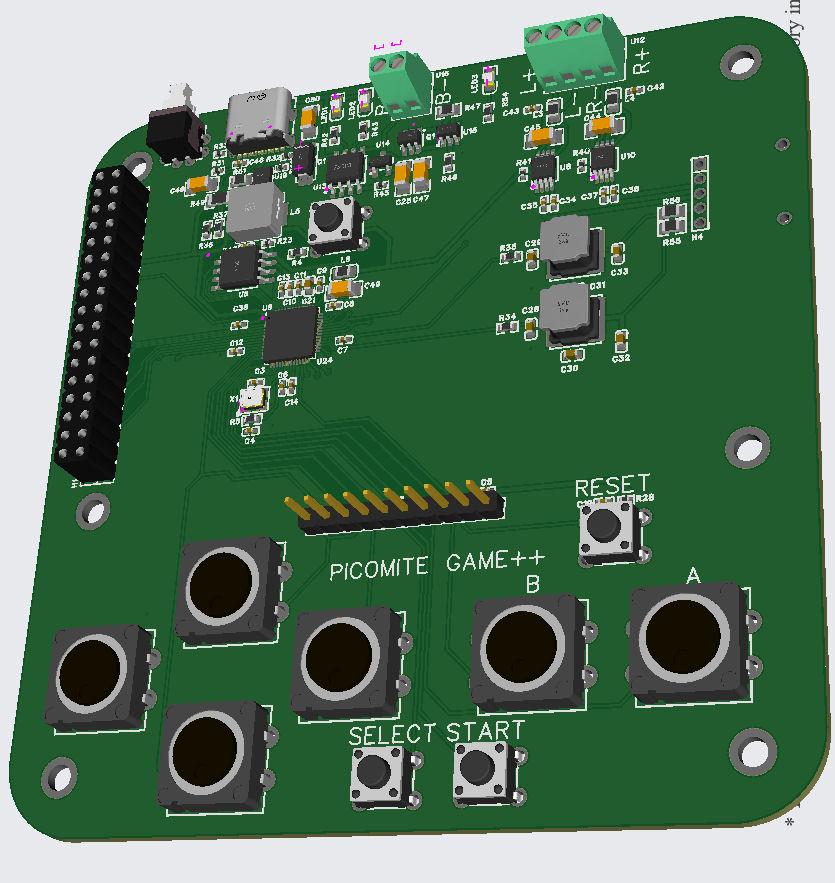
I've had a change of approach since receiving the prototypes and decided to make the board completely compatible with Tom and Mick's So:  This does away with everything I2C and reverts to their basic idea and will be completely S/W compatible, i.e. Tom's code will run completely unchanged. The functional difference are stereo audio with manual volume control, no switch needed for charging as proper load sharing circuit incorporated, 3.2" 8-bit parallel display (this one) Price fully built from JLC GBP123 for 5 including DHL 2-4 day shipping. Schematic: f94094e4-b4f1-4589-8a8f-b02ffff7ad69.pdf |
||||
| Page 1 of 3 |
|||||