|

|
Forum Index : Other Stuff : Best welder
| Author | Message | ||||
| Tinker Guru Joined: 07/11/2007 Location: AustraliaPosts: 1904 |
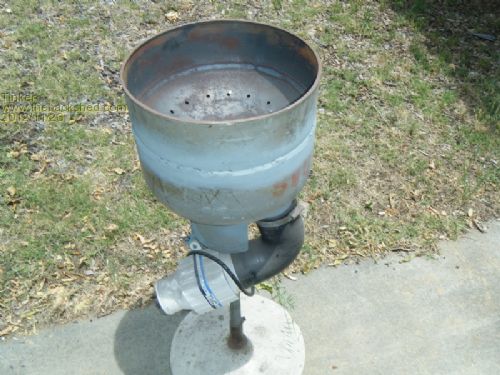
Downwind posted an interesting idea using a cast brake drum for a forge. I have seen one in use and thought I'd make my own version of forge for a job where I needed to heat thick flat bar in order to bend it. This is what I came up with and it worked much better than I expected. 
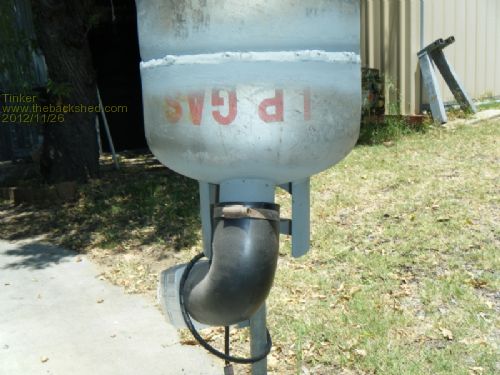
Another view: 
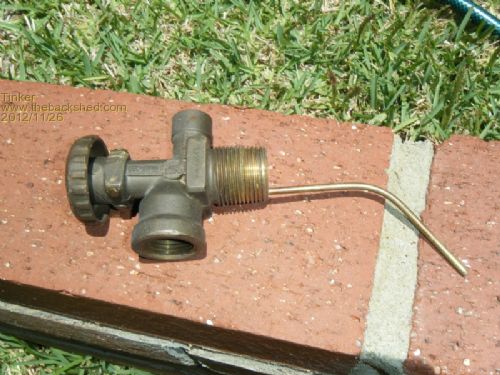
I started with an old 9kg propane bottle which I got for nothing. It was empty but I left it with the valve wide open sitting outside for a week anyway. Now, these things can be like a bomb so I had to get the valve off and fill the bottle with water before cutting it up. Taking the valve off was quite a task, it is screwed in with some sealant that sets rock hard. I clamped the bottles foot ring in my vise and used a 300mm adjustable spanner which needed a 2m long extension handle tube to do get the seal broken. This is where one finds out if that adjustable spanner was worth keeping in the toolbox  , mine survived BTW. , mine survived BTW.
The removed valve looks like this: 
After letting the water remove any remaining trace of gas from the bottle it was time to cut it in half. A 100mm angle grinder with a 1mm cutting disk does the job well. I cut along the weld mid way up the bottle, assuming it was a butt weld. It is not, one bottle half is spun to a smaller radius so the two bottle halves lock together before they are welded. Cutting at the weld means cutting through 2 metal thicknesses, taking a lot longer than would cutting a little higher through only 3mm of steel. Then, after cleaning the cut area I drilled the air holes in the bottom half. There are two rings of holes, one inside and one outside the remaining bottle base ring. The holes were not too big to let ash fall through but big enough not to get clogged by it. Next the air inlet tube was fitted, the big hole for it was done by drilling a ring of small holes first. The lower bottle half was then inserted into the upside down upper half and both welded together again. I used a 12V DC bilge blower for the air source, this one was on special but they are not very expensive anyway. Its the only thing I bought for this forge. The blowers speed is finely controlled by a variable power supply, letting me have a faint glow to a roaring inferno in the forge bowl. You'll note the air inlet tube is at an angle, two reasons for that. One, it let me use the valve thread to screw in the tube for the stand, it can be unscrewed if I want to store this forge on a shelf. And two, it prevents hot ash falling directly onto the plastic fan blades when I switch off the fan. The rubber elbow tube between the blower & the inlet tube is from a 4WD snorkel, I had it lying on a shelf for years and now it finally found a second use. The forge works well, I used it with charcoal as that is what I had on hand but that makes a lot of sparks. I'm sure there is a coal better suitable for forges but I don't know where to look for it when I next need to fire it up - any ideas? Klaus |
||||
Downwind Guru Joined: 09/09/2009 Location: AustraliaPosts: 2333 |
[quote]I'm sure there is a coal better suitable for forges but I don't know where to look for it when I next need to fire it up - any ideas? [/quote] Its called "Coke".. no not the white powder or rock stuff from the bloke on the street corner who looks like he fell face first into the fishing tackle box. And not the fizzy drink in a can. Coke is part burnt coal and looks a bit like volcanic gravel, ask around as you can get it in bags about 3 foot high for $20-30.00 You get a lot of use out of a bag, you will need some charcoal burning first to light the coke, and if the coke is not deep enough to maintain enough heat to keep it burning it will die out. Nice work Klaus. Normally the air in and ash out is done through the centre of the bottom, so the fire can be better controlled to give a hot spot to work with. You move the coke into the centre as needed to give the heat and area required, this saves excess use of the coke and you dont need a rageing fire within the whole forge, just the area you are working in. Here is a quick drawing of how many old forges were built for air in and ash out. The ash dump is just a flapper plate with a counter weight off the hinge side to keep the vent shut, all you do is lift the counter weight up and it dumps the ash and as the weight falls back with a "KlunK" it helps shake the ash off the grate, otherwise you blow flyash everywhere when you blow air through it. A lot of people have used the heater fan from a car run off a battery for the air, and if you get the speed control from the dash with the fan then its ready made. Pete. Sometimes it just works |
||||
| Wombat Regular Member Joined: 27/05/2011 Location: AustraliaPosts: 72 |
I have my welder, helmet and gloves now. 
Some E6013 2.5mm rods were included! I also bought some E6013 2.0 mm rods. Now I can compare the two and see witch one will do what. Want to try some 'Ferrocraft 12XP' rods which are supposed to be 'low stick'. Will be interesting to see the comparison. Nice anvil and furnace. Very scary cutting gas bottles. Russ  |
||||
mac46 Guru Joined: 07/02/2008 Location: United StatesPosts: 412 |
Hey Wombat, Hows school going by now? Just keep you'r welding speed nice and steady, slow, and keep the arc air gap about 1/8th of an inch...no high gaps or you will get pockets of flux in you'r welds. You may need to swing back and forth from side to side, holding momentarly at each side to heat it up, pull to the other side and do the same...try to not trap the flux in the weld. Also 'V' the steel and make more than one pass. Before you know it you will be an old hand at it and all the neighbors and their friends will be bringing you projects...expecting it done "Now" and free. Just take the time to look the area over for flamables before you start, keep fire fighting tools handy, ...and very important, Never weld a rim with the tire still mounted to it...Never, Never...it may take hours, but it will start on fire inside and rapidly build pressure and blow up. Mac46 I'm just a farmer |
||||
| yahoo2 Guru Joined: 05/04/2011 Location: AustraliaPosts: 1166 |
Found a bit of YouTube-age that has some nice shots of laying down weld. Stick welding is better...sometimes The rods he has chosen are because he is using an AC welder, with a DC machine the vertical down would normally be done with a 6012 rod. Its worth having a browse around at his other stuff, there is footage of mig, tig, stainless, aluminium welding at Welding tips and tricks. Its only shop welding and basic repair work, not much there for the advanced in-field repair welder, but it shows the engineering basics very well. Almost 200 videos. I'm confused, no wait... maybe I'm not... |
||||
| Georgen Guru Joined: 13/09/2011 Location: AustraliaPosts: 462 |
Very nice welds indeed. George |
||||